Disto X2 Calibration
TopoDroid 4.0.1 (most recent version)
This is a step by step guide on how to calibrate your Disto X2 (based on a Leica Disto X310 E7400x) by Fofo Gonzalez. You can also check out the Quick Reference Guide.
Read this whole guide before taking your Disto X2 to a cave! There are some things that you need to download and install first.
The instructions are for using TopoDroid (the PocketTopo version for Android).
Please note that this manual is for TopoDroid 4.0.1, the most recent version (May 2018). If you have previous versions, please use their own calibration guides: Version 2.5, Version 2.4, Version 2.3.
If you prefer PocketTopo, you can download it here:
• http://paperless.bheeb.ch/download.html#PocketTopo
You will need to use a Windows laptop, tablet or phone to use PocketTopo.
For TopoDroid you can use any Android phone or tablet. We can’t really recommend one over the other (PocketTopo vs. TopoDroid), since we haven’t used PocketTopo, it’s just that Android is more popular for tablets and phones and we feel more comfortable using TopoDroid. From the brief comparison we did, it seems TopoDroid is getting more focus on software updates and has a more refined interface.
Hints and tips:
• It should take a total of about 45 minutes to run both the software installation and the calibration procedure.
• The first steps (software downloads and Bluetooth pairing) should take place in your home or office, since you will need an Internet connection. This should take about 30 minutes (much less if you are comfortable downloading and installing apps in your Android device).
• The calibration should take place in the forest or a cave, since any magnetic metal nearby can affect the calibration. Be careful about jewelry, watches, belts, etc. Also, calibrations are valid for a geographic area, so ideally you should calibrate the Disto X2 in the geographic area where you will use it. Calibration should take about 15 minutes.
• Sometimes, when in use, it’s difficult to feel for the “On” button on the Disto X2 to take a measurement. A drop of hot-melt glue on it makes it easier to find.
Before starting the calibration, follow these steps:
1. You will need an Android device (phone or tablet). For just calibration a phone would suffice. If you are thinking about sketching on the device, a tablet would give you more space (and a stylus is a must).
2. Download the manual for TopoDroid from this address (you can do this on your computer or your Android device):
• https://code.google.com/p/topolinux/downloads/detail?name=TopoDroid-v.2.pdf&can=2&q=
3. On your Android device download the symbol pack from this address:
• https://code.google.com/p/topolinux/downloads/detail?name=TdSymbol-20130102.apk&can=2&q=
4. On your Android device go to your Downloads folder and locate the file TdSymbol-20130102.apk.
• Your device probably has the security option that prevents installation of apps not downloaded from Google Play. If that’s the case, then:
• Go to Settings > Security and move the slider that says “Unknown Sources: Allow installation of apps from sources other than the Play Store.”
5. Double click the TdSymbol-20130102.apk file to install the symbol library.
• If you allowed the installation of apps from unknown sources, now go back to Settings > Security and return the slider to its original state.
6. On your Android device download TopoDroid from the Play Store (the installation is automatic):
• https://play.google.com/store/apps/details?id=com.topodroid.DistoX
7. Download the Disto X2 User Manual and the Calibration Manual from this address (you can do this on your computer or your Android device):
• http://paperless.bheeb.ch/download.html#DistoX2
Now you´re done with the downloads and app/software installation. Next, make sure that your Disto X2 communicates via Bluetooth with your device:
8. Verify that your Disto X2 has Bluetooth on. You should see the Bluetooth “B” on your Disto screen, in the upper left. If not, press and hold CLR and FUNC for 2 seconds to turn it on.
9. On your Android device go to Settings > Bluetooth and look for available devices.
10. It may take a few seconds for your Android device to find the Disto X2. When it does, select it from the list of available devices. It may ask for a code to pair it; if so, use 0000 (four zeroes). The Disto X2 will have a name like "X310 1234 00:11:22:33:44:55." Note the four digits after the "X310" since they identify your unit and you will need them later to select it from a list if you have paired several units to your Android device. It's a good idea to write those on your unit.
11. Your Disto X2 and your Android device should be paired now.
Now you are ready to start using TopoDroid:
12. Open TopoDroid on your Android device.
13. There are four main functions in TopoDroid:
• Disto selection (you can only use one Disto X2 at a time with TopoDroid, but you can have several Distos registered with your Android device).
• Calibration.
• Shot taking.
• Sketching.
14. First, get TopoDroid to recognize your device. On the main screen touch the “Disto” icon.
15. Your Disto X2 should appear on the list on the screen (identified by the four digits noted during the pairing process). Touch it to select it, the active unit is noted at the very top of the page ("Using 1234 00:11:22:33:44:55").
- If your device does not appear on the list touch the "menu" icon typical of Android (a stack of dots):
17. On the top menu you will see the "gear" icon.
18. Touch the “gear” icon and a pop-up menu will open. Select “New calibration” from this menu. If you have previous calibrations, they will be listed in this pop-up. To upload a previous calibration you can select it from the list and upload the coefficients to your uni withoud having to perform the whole shot taking routine (you can skip to step 24 if you have selected a previous calibration).
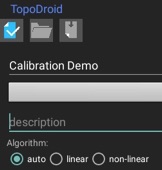
19. This will bring another pop-up menu where you can create a new calibration for this particular Disto X2 or open a previous calibration. Select “New Calibration” from the pop-up menu. In the next screen you can give it a name and a description. At the bottom of this screen, leave “Auto” selected.
20. To confirm/save, touch the “checkmark” icon.
21. Now touch the “folder” icon. It turns blue when there's a name for the calibration.
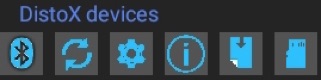
This will bring you to the shot taking screen, with these icons as a header:
22. Start taking the 56 calibration shots. The sequence doesn’t matter. You can review which shots need to be taken at the end of this manual (at the bottom of this page). You can download all 56 shots at the end of the process, or download to your device every few shots. To download the shots, touch the “downward arrow” icon. If you can't download the shots, touch the "menu" icon and then go to "Settings" and verify that the algorithm is set to "Auto," and you can reset the Bluetooth connection too (by touching the Bluetooth icon).
23. After taking all shots and downloading them to your Android device, touch the “group the shots” icon. This assigns the shots to data groups. A pop-up window will say "Policy: group by four." Press "OK."
24. Then touch the “gear” icon.
• A popup window will appear, showing the “Error” in the calibration shots. If the error is less than 0.5 degrees the calibration is good. You can then touch “Write calibration.” This will update your Disto X2 with the calibration value and it will be ready to use. If the value is larger than 0.5 you will need to re-run the calibration routine.
25. If the error value is less than 0.5 and you touched “Write calibration” then you just need to touch your device's back button to clear the pop-up with the calibration error, then touch the “revolving arrows” icon to get the Disto out of calibration mode into shot-taking mode, and your Disto is ready to use. Touch the back button three times on your device to get back to the main screen.
You can now start using the Disto X2 to take shots for surveying. You don’t need to use your Android device for this. You can use a normal sketch book for taking notes, like you do with Suuntos. However, it’s simple and fast to transfer data by Bluetooth, and eliminates transcription errors.
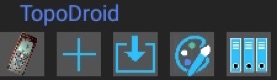
26. On the main screen touch the “plus” icon.
27. This opens a pop-up menu where you can name your survey, change the date, list the team, include the magnetic declination and add a short description. You can select the option to “save” the information, which will bring you to the previous screen and then you can select the survey you just created to start adding data to it, or you can select “open,” which actually saves and opens the survey so that you can start adding data.
28.Start taking shots with the Disto X2. You can download the shots to your Android device by touching the “downward arrow” icon.
29. To get to the sketching screen, touch the “sketch” icon. You will need a stylus (you could use your finger, but it's not ideal).
30. If you installed the symbol pack you can change the line type and color, add cave symbols like columns, mud, etc, and quickly create filled-in colored areas. You can also edit lines point by point.
31. Further description of how to sketch is beyond the scope of this manual. Give it a try and have fun!
The 56 measurements
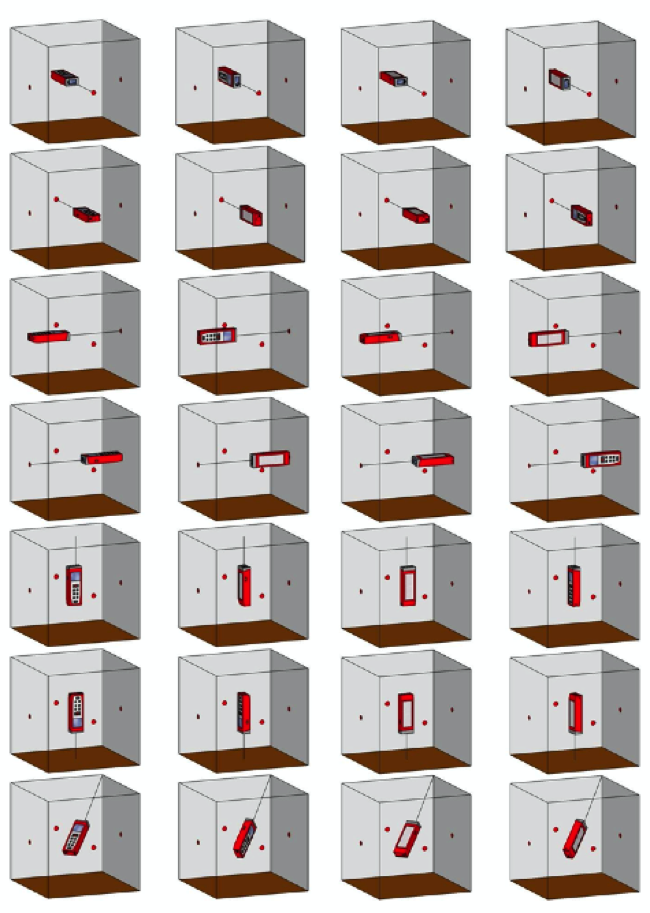
And so on for the remaining 7 vertices of the cube.
and select "Scan." This should update the list and your device should appear in it now.
- If you touch the “Disto” icon and nothing happens most likely you have Bluetooth off. Turn it on and now the icon should be active. In general, any time that you notice that your Disto does not respond, click the "Bluetooth" icon in TopoDroid to reset the Bluetooth connection.
You can now start the calibration routine:
16. In the Disto selection screen, touch the “revolving arrows” icon; this will toggle your Disto unit between shot-taking mode (normal mode) and calibration mode.